

Howto: Use the VIGRA on Windows with MS Visual Studio 2010/12
For the use on any Linux, UNIX or Mac OS please refer to the VIGRA-Reference-Manual (Installation).
Microsoft Visual Studio is a (former) commercial IDE, but depending to contracts between your university, you may even get a free full version, thanks to the MS Dreamspark project. You may use this version as long and as often as you want, but it is strictly prohibited to create commercial applications using this version of Visual Studio. The Visual Studio (c++ part) includes the MS C++ compiler, which is one of the fastest on Windows. On the other hand, historically, this has also been one of the worst compilers comparing to the GCC on UNIX/LINUX when talking about standard-conformity. That also meant other failure messages, different compilation behaviour, no makefiles but project files and so on... Since version 2003, the support of the C++ standard has grown fast, so that you do not need many changes to get your GCC code running on Visual Studio. Another argument for the IDE is the well integrated Debugger, the automatic code-completion and syntax-highlighting just to mention some.
The following steps describe what you have to do, when you want to use the vigra with this IDE.
1. Download and unzip
-
First of all, you have to chose the platform for which you want to develop, either 32bit oder 64bit. For modern Windows systems, which are 64bit-based it is possible to create either 32bit or 64bit applications. Since the compilation of the VIGRA (1.10.0) requires many other dependencies and a lot of knownledge w.r.t. C++ and compilation issues, I provide pre-compiled binaries here for download:
You have the choice between one version, which contains all neccessary packages and the python bindings as well as a msvc-compiled python27 (VIGRA+Python) and a complete development environment containing Qt4, pylad and spyder (VIGRA+Spyder), too. Here, I procide binary packages for the use within Visual Studio 2010 or 2012. -
After downloading, please unzip the archive to any path you want. For this howto, we assume that the unzipped "Win32" folder has been renamed as the folder
C:\local\Win32
2. Edit Environment Paths
To ensure that your self compiled programs are executable, you have to edit the systems enviromnent wrt. to the pre-compiled DLLs und executables. To do so, go to "Computer->Properties->Advanced Settings->Environment Variables". Please prepend the following string to the 'PATH' variable
- For VIGRA+Python
C:\local\Win32\bin;C:\local\Win32\perl\bin;C:\local\Win32\python;C:\local\Win32\python\Scripts;C:\local\Win32\python\DLLs;
If you neither use Perl nor the Python-Bindings, it should be sufficient to pepend
C:\local\Win32\bin;
to the PATH. - For VIGRA+Spyder
C:\local\Win32\bin;C:\local\Win32\perl\bin;C:\local\Win32\qt\bin;C:\local\Win32\python;C:\local\Win32\python\Scripts;C:\local\Win32\python\DLLs;
- If you'd like to develop applications using the Qt4-Framework, you need to download the Version with Spyder included. To get the shipped Qt4 working, you have to tell Qt about the coorect installation path at your system. Do this by creating an empty file:
C:\local\Win32\qt\bin\qt.conf
with the following content (following this example):[Paths] Prefix = C:/local/Win32/qt
3. Visual Studio Project settings
To write your first VIGRA-based application, start Visual Studio and select a Win32 Console application as a new project. Please ensure in the build settings, that the target (architecture) is set accordingly to the downloaded VIGRA-environment, either 64bit or 32bit.
Afterwards, you have to edit/add some elements to the project's properties (for all configurations):
- C/C++ -> Additional Include-Directories:
C:\local\Win32\include
- Linker -> Additional Libary-Directories:
C:\local\Win32\lib
- Linker -> Input -> Additional Libraries
jpeg.lib
png.lib
zlib.lib
tiff.lib
IlmImf.lib
Imath.lib
Half.lib
Iex.lib
IlmThread.lib
hdf5.lib
hdf5_hl.lib
fftw-3.3.lib
fftwf-3.3.lib
vigraimpex.lib
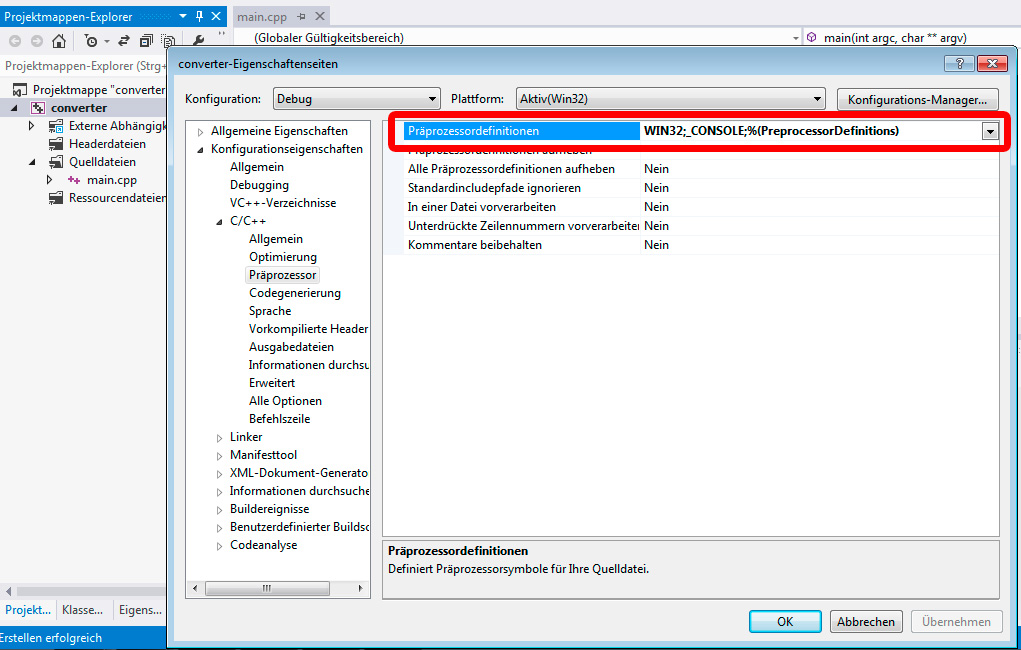
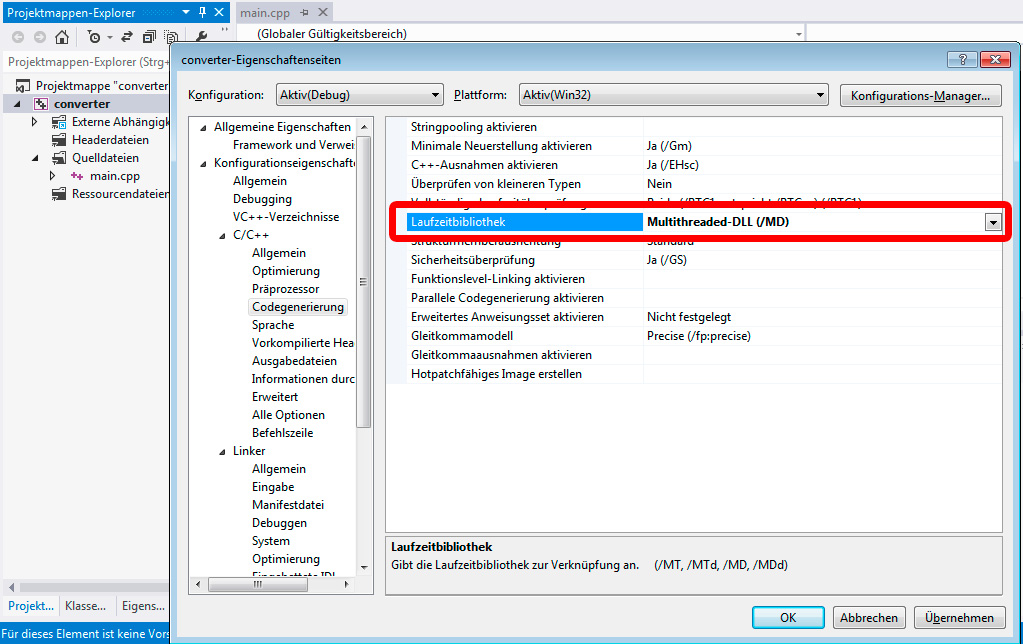
For Debug configurations you need to make some additional changes for the project's properties:
- C++ -> Preprocessor -> Preprocessor Definitions:
Remove the _DEBUG flag like it is shown in this image. - C++ -> Code generation -> Runtime library:
Set the Runtime library to: Multithreaded-DLL (/MD), like it is shown in this image.
After these settings have been set, the program should compile fine. And you should be able to use all of the VIGRA's functionality inside it.